
Form Registration and Login
Dreamweaver Extension for MX, DW8, CS3, CS4, CS5, CS6, CC, ...
Form Registration and Login is an extension for Adobe Dreamweaver that facilitates creation of user registration forms, thereby allowing access to determined pages of your website only to users who registered themselves.
With this extension you can:
- Create a registration form with the fields you wish to include, including the possibility of uploading files (ex., picture, resume, ...)
- Insert login forms (asking for user name and password) in your pages
- Protect determined pages by only granting access to registered users, after login
- Access an Administration Panel (included), from where you can review and modify Registered Users records.
The user list can be saved either in a MySQL database or simply in text files on your website,as you wish. The MySql version is more appropriate if you want to link the user table with other tables in your system or if you plan to add new functionalities for registered users. On the other hand, the version of saving the data in text files is simpler and does not require third party's database systems.
Basic mandatory requirements:
- Dreamweaver MX or later versions, including MX 2004, DW 8, CS3, CS4, CS5, CS6, CC...
- Your web server must support PHP scripts (version 4.0 or later versions)
- Pages that you wish to restrict to Registered Users Only, must have .PHP extension or any other extension that allows execution of PHP scripts.
If you wish to save data (user list, sent data, ...) in form of files on your website, (which is simpler), then you must set:
- Writing permissions on the folder "HDWRegistrationAndLogin/saved_forms".
If instead, you prefer to save all data in a MySQL database, then you will need:
- MySql 3.23 or later
Note: Hosting providers usually restrict the size of files that you can upload with a form, usually to around 2 MB per form. In relation to the files uploaded from the registration form, these are usually limited by the hosting services to 2 MB for each sent form. Note that this restriction is entirely due to your hosting provider.
Click here to open the demo (new window).
The demo allows you to test a registration form, login form, protected pages and the administration console. If you want to see in detail how we created this demo then please check this video
Animated demo: click here to open
Read the details in the "Installation" and "Notes" sections on this page.
You can find more about in our Form Registration and Login - FAQ.
The first step is to install the extension in your Dreamweaver. To do that, double click the downloaded .mxp file.
After that, start Dreamweaver; in the menu Commands, three possible options will appear:
- Registration and Login: Insert Registration - This is the option you have to choose to convert a form - created previously - into a Registration Form. The only requirement is that the form must have its <form...> ...</form> tags and two fields that will be used to select a user name and a password.
- Registration and Login: Insert Login Page - This option serves to insert a login form into your page. In this case you don't need to create a form, it will be generated automatically in your page.
- Registration and Login: Insert Page Protection - This option needs to be chosen to indicate that the related page is only available to Registered Users. Note that this page needs to have an extension allowing execution of PHP scripts (as for example .php, php4, php5, ...)
First step:
The first option that you have to use is "Insert Registration" which is required to be completed before to proceed to other two. Before accessing that option, make sure you already prepared the page, containing the form, that you want to transform into a Registration Form, and that this form has at least two fields corresponding to User Name and Password. When you access Dreamweaver menu >> Commands >> Registration and Login: Insert Registration, the following dialogue will appear:
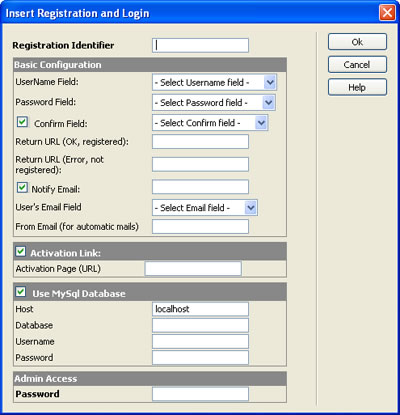
The fields of this window are:
- Registration Identifier: This is the identifier of the registration form. You can have several independent Registration Forms on your website; the Identifiers are needed to differentiate them and to restrict the access to pages. This Identifier will match the name of the table or file where the data will be saved, which is why it cannot have spaces or special characters.
- Basic Configuration
- Username field: Choose here a field in your form that corresponds to the username.
- Password field: Select here the field in your form that corresponds to the password.
- Confirm field: Mark this option if you want your users to enter password twice in order to avoid errors. After marking this option, choose which field corresponds to the password confirmation.
- Return URL (ok, registered): This is the page where the user is redirected in case this registration step has been completed correctly. You must create this page. You can use it to explain users how to login or how to activate their account in case activation is required.
- Return URL (error, not registered): In case registration fails, the user will be redirected to the page indicated here. You must create this page.
- Notify Email:If you wish to receive a notification each time that a new user registers, enter here the email address where such notification should be sent.
- User's Email field: Select here the field in your form that corresponds to user's email - which will need to be validated. This email will be used as recipient for the welcome and activation mails (if used).
- From email: Enter here what should appear as the "From" on the emails that will receive the user (welcome and activation mails). Usually this is your email address, so the users can reply back to you to ask for support.
- Activation link: The registrations can be activated instantly or you can require validation of the email address. Mark this field in case you require a validation.
- Activation page (url): Enter here the address of the page where user will be redirected once the activation is successfuly completed. You must create this page; you can indicate in it how to login, or simply include the login form.
- Use MySQL Database: Mark this option if you wish to save the Registered Users' data in a MySql database. If you don't mark this option, data will be saved in a text file on your website.
- Host: The IP or the name of the server where your MySQL is located. In most cases it will be "localhost"
- Database: The name of the database to be used (needs to be created previously).
- Username: Username to access the database.
- Password: Password to access the database.
- Admin Password: Password that will be used to access your Administration Panel, which will allow you to review and modify the Registered Users' data.
After clicking on the "OK" button, the appropriate files will be generated, and the form in your page will be transformed in a Registration Form.
Second Step:
To insert a Login Form in your page you can use the option Dreamweaver menu >> Commands >> Registration and Login: Insert Login Page, which will trigger the following prompt:
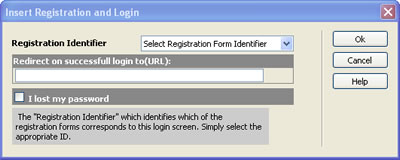
The first field is the "Registration Identifier" which identifies which of the registration forms corresponds to this login screen. Simply select the appropriate ID.
The second field is the address of the page where the user will be redirected in case the login is performed correctly, normally it is one of the pages with restricted access that you need to create.
The third field is to include the "I lost my password" feature that allows recovering forgotten passwords.
Note that the login form, unlike the registration form, is generated completely in its page, you just need to mark the place where you want it to be inserted.
The page that contains the login form must have a PHP extension or another extension that allows the execution of PHP scripts.
Third Step:
Finally, to protect the pages, i.e. to indicate if a page can only be accessed by Registered Users, you will have to open the related page and use the option Dreamweaver menu >> Commands >> Registration and Login: Insert Page Protection, which will trigger the following prompt:
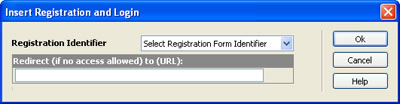
The first field is once again, the Registration Identifier, which indicates which of the login forms the user will have to use in order to access the page. Note that you can have several registration forms in your website, which can function independently, since every one will have a different login screen.
The second field is the URL of the page where the user will be redirected in case of failing to login, i.e., in case he or she needs to go through the login procedure again.
This protected page must have a PHP extension or another extension that allows the execution of PHP scripts, because the protection code is a PHP fragment that is inserted in the beginning of the page.
The administration panel:
The admin panel location is similar to this one:
http://YOUR-WEB-SITE/HDWRegistrationAndLogin/admin
Note: Replace "YOUR-WEB-SITE" with your own website domain.
Editing the activation and confirmation emails:
To edit the contents of the activation email, you can open the file "/HDWRegistrationAndLogin/email_texts/ActivationMail.txt" using any text editor (or Dreamweaver itself) and write the desired text of the email message there. The first line is used as Subject, the remaining lines are the body of the message; make sure that you respect the %USERNAME, %PASSWORD and %URL directives, which will be replaced automatically by the appropriate values when the message is sent out.
The same editing method can be applied to the "confirmation/welcome email" (/HDWRegistrationAndLogin/email_texts/WelcomeMail.txt). The confirmation/welcome mail is sent after the registration or activation (if required).
Validation of the registration form:
When you apply "Dreamweaver Menu >> Commands >> Registration and Login: Insert Registration" for the first time, a JavaScript will be automatically added to make sure that:
- the field used as "username" is filled in;
- the field used as "password" is filled in;
- the password matches its confirmation in case this option is selected;
- the email field to receive the activation email is filled in properly, in case this option is selected.
- the username is not already in use
Nevertheless, if you wish to use other validation types, you can overwrite the one that is generated automatically and use your own validation scripts.
Creating a logout page
Note that a logout link is created automatically with the registration form, however if you want to create additional logout pages, to convert a PHP page in a logout page all you need is to insert this block code on the first line of your (logout) page:
<?php
  error_reporting(7);
  session_start();
  foreach ($_SESSION as $item=>$value)
    if (substr($item,0,7)=='logged_')
      $_SESSION[$item] = "";
?>
When the page will be loaded in the browser the login indicator in the user session will be cleared.
Avoiding spam
To avoid spam of automatic registrations, we recommend using a captcha code in the form. Captcha scripts are not included with this extension, but if you need this option, we recommend our extension "Form Captcha" which is perfectly compatible with this Registration Form extension. Note that in this case captcha will be applied in the page that contains the registration form, and the "to be protected" page would be "/HDWRegistrationAndLogin/RegistrationAndLogin.php" which is the one in charge of processing the form.
|
Preferred payment & download method:
|
||
| Paypal or Credit Cards: |
PRICE
USD $59.99
After payment you will be redirected to a direct-download page and the download link will be emailed to the payment address.
|
|